Showing posts with label onion. Show all posts

Thursday, October 18, 2012

Week 18: Potato and Onion Knishes


After a potato-filled summer that led to a potato-filled fall, this is a fitting (and filling!) way to send off the CSA season.

How many potatoes? you ask. We totaled 42 pounds over the last 15 weeks. Clearly we hit some kind of weather jackpot for potatoes. (The other notable delivery: six heads of cabbage and six heads of cauliflower, which doesn't sound like a lot -- until you start thinking about eating a head of cabbage and a head of cauliflower each week for a month or so.)

Back to the potatoes: You'll need only a pound and a half, or about 3 medium potatoes, to make these knishes. Which you should do. Like, now. They are fantastic, and they are much easier to make than you might think.

For the recipe, I must refer you to the Smitten Kitchen website. I used the dough recipe as written and made one small change to the potato and caramelized onion filling, substituting olive oil for the butter to keep the knishes dairy free. The Joe Pastry blog, which provided the recipe that inspired the Smitten Kitchen version, also has fantastic step-by-step photos for rolling out and shaping the knishes.

And with that, the season is over, though the kitchen never really closes. Love and knishes to you all.

Monday, October 8, 2012

Week 16: Pickled Red Cabbage, Kimchi Style


With the farm season winding down, and the vegetables piling up, I've been looking for ways to preserve the produce. Recently, that's meant a series of quick-pickle projects: beets, cauliflower, and cabbage. The tangy goodies will keep in the refrigerator for at least a couple of weeks -- our noshing notwithstanding.

For the cabbage, I tweaked a recipe for a pickled, but not fermented, kimchi. This is a mildly spicy kimchi; it's meant to be pantry clearing, not sinus clearing. The recipe starts off with what seems like an unholy amount of salt, but the final kimchi is not overly salty. That's because the salt is used to wilt the cabbage and to draw out some of its water. The salt is then rinsed off before the cabbage goes into the pickling brine.

I'm storing my kimchi in a couple of quart-size pickling jars, which fit nicely in my fridge, but shallow containers are probably better to keep the vegetables evenly submerged in the picking liquid.

Pickled Red Cabbage, Kimchi Style
(Adapted from Creative Loafing Tampa. Makes 8 cups. Note: the salt amount -- 1/2 cup -- is correct; most of the salt will be rinsed off after wilting the cabbage. Makes 8 cups.)

1 red cabbage, weighing about 2 pounds
1/2 cup Kosher salt
2 Tbsp chili paste (Sriracha)
4 cloves garlic, pressed or finely minced
1/2 cup sugar
Juice of 2 lemons
1/2 cup apple cider vinegar
1/3 cup plus 2 Tbsp low-sodium soy sauce
8 to 10 radishes, cut into matchsticks
2 cups thinly sliced onion
2 cups thinly sliced carrot
1 bunch scallions, cut into 1-inch pieces
1 bunch cilantro, roughly chopped

Cut the cabbage into quarters, remove the tough core, and slice the cabbage into bite-sized pieces. Toss the cabbage with the salt. Place the salted cabbage in a large colander; set the colander in the sink, or over a bowl or plate to catch any liquid, and let the cabbage drain for 30 to 45 minutes. Rinse the cabbage thoroughly with fresh water and drain well.

In a large bowl, whisk together the chili paste, garlic, sugar, lemon juice, vinegar, and soy sauce. Taste and adjust the seasonings as desired.

Add the wilted cabbage, radishes, onion, carrot, scallion, and cilantro to the pickling liquid and mix well. Transfer the mixture to a one-gallon resealable plastic bag and squeeze out the air. Place the bag flat in the refrigerator, so the liquid is distributed evenly among the vegetables, and let the mixture pickle for at least two hours, but preferably a day or two, flipping the bag periodically. Store the kimchi in shallow containers or pickling jars, mixing periodically if some of the vegetables are not submerged in the liquid.

Thursday, August 16, 2012

Week 9: Pizza With Potato, Rosemary, and Caramelized Onions


It's shaping up to be a potato-filled summer. How so? We're at the half-way point of our CSA season, and we're up to 16.5 pounds of potatoes. Last year, it was only 4 pounds for the entire 18 weeks. In 2010 and 2009? No potatoes at all. (Wait, I'm not the only one who keeps spreadsheets of such things, am I?)

I like the carb-on-carb combination of this pizza, even though it didn't use up a lot of potatoes. The topping would work on focaccia as well. (For another take on potatoes and dough, consider pierogies, which, admittedly, don't taste anything like this pizza.)

Pizza With Potato, Rosemary, and Caramelized Onions
(Adapted recipe, inspired by many Internet sources)

1/2 pound new potatoes (2 to 3 small potatoes), scrubbed but not peeled
1 onion, sliced
Olive oil
Prepared pizza dough for a 12- to 14-inch pizza
1/4 cup shredded Parmesan cheese
3 to 4 cloves garlic, minced
Salt and pepper to taste
1 Tbsp chopped fresh rosemary

Prepare the vegetables: Boil the potatoes gently in enough salted water to cover, about 15 minutes or until just tender. Drain and rinse with cold water. When cool enough to handle, slice the potatoes about 1/4-inch thick.

Meanwhile, heat 1 tablespoon olive oil in a wide skillet. When the oil is shimmering, add the onions. Cook over low heat until they are very soft, browned, and sweet, stirring occasionally, about 30 minutes.

Construct the pizza: Heat your oven to 450 degrees. Stretch the pizza dough into your pizza pan. (Note: a 10-by-15-inch baking sheet has about the same surface area as a 14-inch round.) Brush the dough with olive oil. Spread the Parmesan cheese evenly on top, then layer the  potato slices, caramelized onion, minced garlic, salt, pepper, and rosemary. Drizzle a little olive oil on top (1 to 2 tablespoons). Bake 15 minutes, or until the crust is cooked through and golden.

Thursday, August 9, 2012

Week 8: Kale (or Chard) Tacos


Sometimes I come across a recipe idea that's so simple, so logical, that I'm a little bit embarrassed that I didn't come up with it myself. Of course, I'm not too embarrassed to share this idea with you now, in case you didn't come up with it either.

Tacos. Brilliant.

Start off by sauteing kale (or chard, but I happened to use kale) with onions and garlic and some spices. Gosh, I do this for almost every kale or chard recipe. Spoon the mixture into tortillas or taco shells, and top with cheese and salsa. That's pretty much it.

Naturally, you can add your own spin to this. Go ahead and caramelize the onions first. Mix in a jalapeno or two. Bump up the protein with black beans. Make a fancy salsa. You get the idea. Or, keep it simple and get dinner on the table in a flash.

Kale (or Chard) Tacos
(Adapted from several Internet sources, which attribute their own adaptations to Mexican Everyday by Rick Bayless. This might be the cooking equivalent of "Whisper Down the Lane." Serves 4.)

1 bunch (12 ounces) kale or Swiss chard, stems removed
1-1/2 Tbsp canola oil
1 large onion, thinly sliced
3 cloves garlic, minced
1 tsp red pepper flakes, or to taste
1/2 cup water or vegetable broth
1/2 tsp salt, or to taste (omit if using salty broth)
Pinch of cayenne pepper (optional)

For serving:
8 to 12 soft corn tortillas (6-inch size) or hard taco shells, warmed (I'm partial to the shells)
About 4 ounces crumbled feta, Mexican queso fresco, or another fresh cheese
Salsa as desired

Slice the kale (or chard) leaves into 1/2-inch ribbons. Heat the oil in a large skillet or a wide Dutch oven over medium-high heat. Add the onions and cook until they begin to brown, about 5 minutes. Add the garlic and red pepper flakes. Cook, stirring, for about 30 seconds, or until the garlic is aromatic, then add the water, salt, cayenne (if using) and the sliced kale/chard leaves. Lower the heat to medium-low, cover the pan, and cook until the greens are almost tender. (This will take about 8 minutes for kale; 5 minutes for chard.) Uncover the pan, return the heat to medium-high, and cook the greens another minute or two, or until most of the liquid has evaporated. Build your tacos with the greens, warm tortillas, cheese, and salsa.

Thursday, July 19, 2012

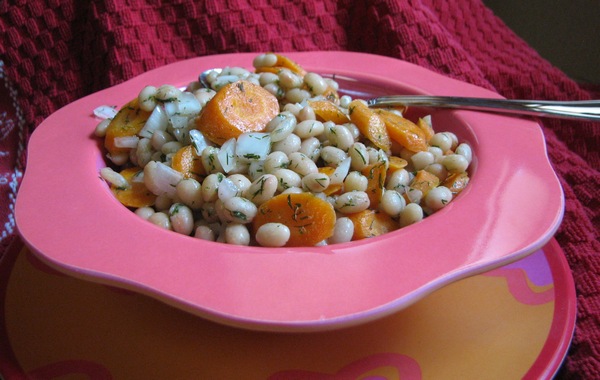
Week 5: Dressed Carrots and White Beans; No-Fuss Potato Salad


There's a certain irony in writing a food blog in the summer. The produce is great, but do you really want to turn on the oven when it's roasting outside? This week, in the interest of energy conservation (mine at least), I've been sticking mostly to salads and stovetop-prepared foods that let me get in and out of the kitchen (and blog) quickly. Here are two to try when you need something quick, easy, and good for a cookout or barbecue.


 Dressed Carrots and White Beans
(Adapted from 101 Cookbooks. Serves 3 to 4 as a side dish.)

1 Tbsp regular olive oil, plus a little extra for sauteing
1.5 cups slender carrots, sliced thinly on the diagonal (about 3 to 4 carrots)
1 15-ounce can small white beans, rinsed and well-drained
2 Tbsp finely chopped dill leaves
1 Tbsp light brown sugar
1 Tbsp fresh lemon juice
Dash salt
About 1/4 cup thinly sliced white onion (mild or sweet variety)

Heat a bit of olive oil in a large skillet over medium-high heat. Add the carrots and cook about 6 minutes, tossing occasionally, or until they begin to soften and brown. Add the beans and dill and cook about 3 minutes longer, or until the beans are heated through. Transfer the mixture to a serving bowl, sprinkle with the brown sugar, and stir gently; the sugar will dissolve. Whisk together the tablespoon of olive oil, lemon juice, and salt. Pour over the carrot-bean mixture. Stir in the onions. Serve warm or at room temperature.

No-Fuss Potato Salad
(A personal recipe, but inspired by several sources. Serves 4 to 6.)

2 lbs new potatoes, scrubbed clean but not peeled
3/4 cup mayonnaise
1 Tbsp apple cider vinegar
1/2 Tbsp white granulated sugar
1/2 Tbsp prepared yellow mustard
1/4 tsp table salt, or to taste
1/2 tsp garlic powder
1/4 tsp ground black pepper, or to taste
1 celery stalk, diced
1/2 cup diced white onion
2 scallions, sliced
Paprika

Boil the potatoes in a saucepan of salted water, 20 to 25 minutes or until fork tender. Drain and cool the potatoes, remove peels if desired, then cut the potatoes into cubes. Place the potatoes into a large bowl.

Mix together the mayonnaise, vinegar, sugar, mustard, salt, garlic powder, and black pepper. Pour over the potatoes. Add the diced celery and onions and stir gently to combine. Chill in the refrigerator. Before serving, garnish the potato salad with the sliced scallions and paprika.

Thursday, July 5, 2012

Week 3, Part 2: Orange, Radish, and Mint Salad; Couscous With Mint and Peas


Sense a theme here? I can't say for sure if the minty foods we've been eating this week have made us feel any cooler, but it's been worth the shot.

Both of these recipes are a little more accessible than the spiced potatoes described in my previous post. They use only common ingredients and don't require any oven time.

Orange, Raddish, and Mint Salad
(Adapted from Ellie Krieger. The combination sounds odd, but the salad is a little sweet, a little peppery, and very refreshing. )

4 navel oranges, sectioned or supremed (see note)
1/2 red onion, thinly sliced
6 large radishes, halved and thinly sliced
1/4 cup fresh mint leaves, chopped
1 Tbsp olive oil
1/4 tsp salt
Black pepper to taste

Combine the orange segments, onion, radish slices, and mint in a bowl. Drizzle with oil and season with salt and pepper. Serve immediately, or let the flavors blend an hour or two in the refrigerator.

Note: To "supreme" an orange: Using a small knife, cut the top and bottom off the orange, stand it on one end, and cut away the peel and pith, following the curve of the fruit. Cut along each segment of the orange and remove the fruit from its membrane. You can leave the orange pieces whole, or cut in half. Add any juices that accumulate on your cutting board into the salad.

Couscous With Mint and Peas
(From many sources)
 
2.5 cups water
1 cup fresh shelled peas
1 10-ounce box plain couscous (about 1.5 cups), uncooked
3 sprigs mint, leaves only
Juice from 1/2 lemon (about 2 Tbsp)
Salt and pepper to taste

Bring the water to a boil in a medium saucepan. Add the peas and cook gently 2 minutes. Add the couscous, cover the saucepan, and remove from heat.

Let stand 5 to 10 minutes, until the couscous absorbs the water. Fluff the couscous mixture with a fork, then stir in the mint and lemon juice. Season to taste.

Friday, May 4, 2012

Triple Red Slaw


New England can be a frustrating place to live, with its notoriously fickle weather. We get a blast of summer heat and sunshine -- several blasts, actually, in a rather mild winter -- and it dissolves into a week of cold rain, drizzle, dreariness. More March than May; more Seattle than Salem. (And by Salem, I mean Massachusetts, not Oregon.) We need the rain, of course, but after the tease of beach blankets and barbecues we find ourselves huddling under crocheted afghans and eating soup.

It was on one of those beachy, barbecue-y days in April that I happened to make this slaw. A little tangy and very red, the slaw is a good complement to burgers, chicken, or fish. It would be a cheery addition to a picnic or cookout, and a bright spot on an indoor table, no matter how gray the day is.

Triple Red Slaw
(Adapted from The Boston Globe. The "triple red" ingredients are red cabbage, red onion, and red wine vinegar. The acids in the vinegar prevent the cabbage from turning bluish or greenish when cooked. Serves 4-6.)

2 Tbsp. canola oil
1 red onion, peeled, halved, and sliced thin
1/3 cup red wine vinegar
1 Tbsp sugar
1/2 tsp kosher salt, or to taste
Black pepper to taste
1 pound (about 1/2 medium head) red cabbage, cored and thinly sliced

In a large skillet over medium heat, heat the oil. Cook the onion, stirring frequently, until it softens, about 5 minutes. Stir in the vinegar, sugar, salt, and pepper. Add the cabbage, turn up the heat to medium-high, and cook, stirring constantly, for 5 minutes or until the cabbage wilts and softens slightly. Adjust seasonings to taste. Serve warm or at room temperature.

Wednesday, July 27, 2011

Week 7: Rustic Onion Tart

This week I've been all for simplicity. Boiled corn and new potatoes ... grilled pattypan and yellow squash ... sauteed kale ... you get the idea.

The most ambitious bit of cooking for the week was an onion tart. And by "ambitious" I mean: has more than two ingredients. This is one of those recipes where the individual parts (butter, flour, onion) add up to so much more (sweet, caramelized onions and a flaky, buttery dough). I suspect any kind of yellow or white onion would work in this recipe, giving it year-round possibilities, though my motivation was a large bunch of spring onions from my share.

The tart was equally delicious served warm at supper and eaten cold, straight from the refrigerator. If making tart/pastry dough intimidates you, try this one; it's quite forgiving.

Rustic Onion Tart
(Adapted from The Art of Simple Food, by Alice Waters)

   For the Dough:

1 cup all-purpose flour
1/4 tsp salt
6 Tbsp cold butter, cut into small cubes
1/4 cup ice-cold water

   For the Filling:

2 Tbsp olive oil
2 Tbsp butter
2 lbs onion, thinly sliced (about 6 medium onions)
1/2 to 1 Tbsp fresh thyme leaves
Salt to taste

Stir the salt into the flour. Using a pastry blender, cut the butter into the flour mixture until only a few large pieces of butter remain. Pour in about three-quarters of the water and stir the mixture with a fork until the dough forms clumps, adding the remaining water in small increments as needed. Bring the dough together into a ball, wrap in plastic and flatten the ball into a disk. Refrigerate the dough for 1 hour or more.

Meanwhile, heat the oil and butter in a large skillet over medium heat. Add the onions and thyme, and cook, stirring occasionally, until the onions are very soft and juicy, 20 to 30 minutes. Add salt to taste and continue to cook the onions until they begin to turn golden and caramelize. This could take another 15 to 20 minutes. The liquid should evaporate as the onions cook. Transfer the onions to a bowl (draining any excess liquid, if necessary) and let cool for at least 10 minutes.

Preheat your oven to 375 degrees. Line a large baking sheet with parchment paper. Flour your work surface and rolling pin, and roll out the tart dough to a 14-inch circle. (If the dough is too hard to work with, let it warm up 15 or 20 minutes at room temperature first.) Transfer the dough to the baking sheet and return it to the refrigerator for about 10 minutes to firm up.

Spread the onions on top of the dough, leaving a 1.5-inch border all around. Fold up the border over the onions to create an edge to the tart. Bake the tart for about 50 minutes, or until the crust on the bottom is golden brown. Slide the tart onto a rack to cool. Serve warm or at room temperature.

Wednesday, July 13, 2011

Week 5: Fresh Pea Soup

Lots of good stuff in the share this week: Lettuces for salad, beets for roasting, onions for sauteing, summer squash for stuffing, more squash for roasting, and raspberries (yes!) for eating out of hand while cooking all that other stuff. Plus, a good friend gave us a taste of her CSA with a gift of some beautiful scallions and fennel and chard and herbs, in exchange for a couple of squash and some peas.

Let me tell you about the peas. Caboodle and I have shelled a good 10 pounds of peas over the past two weeks. We may have reached the end of the season, as the pea pods this week were positively enormous -- a tad overgrown, really -- with individual peas the size of chickpeas. Still, the peas were nibble-worthy raw, and even better in soup.

Split pea soup, made from dried peas, is definitely stick-to-your-ribs, cold-weather comfort food. I found fresh pea soup, on the other hand, to be something of a revelation: far lighter, more delicate, and quick to cook. As hot soups go, this is a plausible one for a summery day.

Fresh Pea Soup

(Inspired by Ina Garten)

1 Tbsp butter
1 Tbsp olive oil
2 cups chopped onion
1 medium carrot, chopped (about 1/2 cup)
4 cups vegetable stock
5 cups shelled fresh peas
2/3 cup chopped mint leaves (loosely packed)
2 Tbsp fresh lemon juice, or to taste
Salt and pepper, to taste
2 Tbsp chopped chives, for garnish (optional)

Heat the butter and olive oil together in a large soup pot or Dutch oven over medium heat. Add the onion and carrot, and cook for 5 to 10 minutes or until the vegetables soften. Add the stock, raise the heat to high, and bring to a boil. Add the peas, lower the heat, and simmer the soup until the peas are tender, 3 to 5 minutes, depending on size. Remove from the heat and add the mint.

Let the soup cool a couple of minutes, puree it in batches in a blender or food processor, and return it to the soup pot. Add the lemon, salt, and pepper, adjusting seasonings to taste. Reheat the soup if necessary, and serve hot, garnished with chive if desired. Serves 6.

Friday, December 24, 2010

Tis Another Season To Be Cooking

I popped into my kosher butcher shop yesterday and guess what song was playing on the radio?

White Christmas.

At least we can chalk up that one to a nice Jewish boy. The holiday, too, for that matter.

Anyway, the post-CSA cooking has run the gamut from roasted Brussels sprouts with garlic to rum-tinged cranberry sauce to homemade Pop-Tarts. And I've been on a squash kick of late. Here are a couple of good choices for cold winter evenings.

Squash, Cauliflower,and Chickpea Curry
Vegetarian Cabbage Rolls

These are really before-and-after pictures, as the cabbage rolls are stuffed with rice and leftovers from the squash curry. The recipes and idea are from The Boston Globe. (For a meaty "stuffed cabbage" with a lot less work, check out my Stuffed Cabbage Casserole.)

Another recent hit was this stuffed squash recipe, also via The Boston Globe.

Mushroom and Barley Stuffed Delicata Squash
(adapted, barely, from The Boston Globe Magazine. Mostly, I cut back on the salt and oil, and made minor ingredient substitutions based on what I had at home.)

2.75 cups water
1 cup pearled barley
3 delicata squash, about 1.25 pounds each, halved lengthwise and seeded
Olive oil
Salt and pepper
2 Tbsp frozen orange juice concentrate, thawed
1/2 ounce dried porcini mushrooms, reconstituted and chopped
2 ribs celery, finely chopped
1 yellow onion, chopped
10 ounces button mushrooms, sliced
3 cloves garlic, minced
1/2 teaspoon dried thyme
1/2 teaspoon dried sage
1 1/2 teaspoons balsamic vinegar

In a large saucepan, bring water to a boil. Add barley and 1/4 teaspoon salt, lower heat and simmer, covered, about 35 minutes or until the barley is tender and the water has been absorbed. Remove cover and set aside.

Heat oven to 400 degrees. Brush squash halves with olive oil, sprinkle with salt and pepper, and bake cut side down on a foil-lined baking sheet for 30 minutes. Turn squash halves over, brush each half with orange juice concentrate, and bake cut side up for another 20 minutes. Remove from oven.

While the squash is baking, heat 1 tablespoon olive oil in a large skillet and saute the celery and onion until soft, about 5 minutes. Add the celery mixture to the barley along with the porcini mushrooms. Heat another tablespoon of olive oil in the skillet and saute the sliced button mushrooms until brown, about 8 minutes. Add the garlic and herbs to the skillet and cook another minute more. Add this to the barley mixture, and stir in the vinegar. Taste the barley mixture and adjust the seasoning as desired.

Fill the squash cavities with the barley mixture and bake until the filling is heated through, about 20 minutes.

Thursday, September 30, 2010

Week 16: Stuffed Cabbage Casserole; Turkey Corn Soup


We started off the week with a load of vegetables: leftovers from Week 15 (green cabbage, butternut squash), the current share (red cabbage, broccoli, corn, red and green tomatoes), and our own crops (more tomatoes, both red and green). Here at week's end, I'm not completely caught up -- the squash, for one, remains untouched -- but I've made a sizeable dent.

So what's come out of the kitchen? Salsa verde, served with chips. Corn and green tomato pancakes, eaten as a side dish to tuna. Red cabbage slaw with peanut dressing. Cabbage casserole and turkey soup (detailed below). Still to come: Fresh pasta sauce, pickled green tomatoes, maybe a stir fry with the remaining cabbage. And something with squash.
  
Stuffed Cabbage Casserole
(Adapted recipe. The original uses a can of tomato soup and a can of soup water instead of tomato sauce. The flavor of this dish is reminiscent of stuffed cabbage, but with much less work.)

1 medium green cabbage (about 2 pounds), cut up
1 pound lean ground beef
1 onion, chopped
1/2 cup uncooked white rice
Salt and pepper to taste
2 cans (8 ounces each) tomato sauce

Grease a large baking dish (9 by 13 inches) and place cabbage inside. Brown beef and onion in a skillet. Season with salt and pepper as desired. Stir in rice. Place meat mixture over the cabbage. Pour tomato sauce over all. Cover dish and bake at 350 degrees for one hour, or until the cabbage is tender and the rice is cooked. (Check after 30 minutes and add a little water to the dish if it seems dry.)

Turkey Corn Soup
(Adapted recipe; similar to this one.)

6 cups turkey stock
5 ears corn
2 cups diced, cooked turkey (about 9 ounces)
1 cup sliced celery (about 2 stalks)
3 ounces broad or “homestyle” egg noodles
Black pepper and salt

Place the stock in a large (4 quart) soup pan. Slice whole kernels from two ears of corn and add to stock. Over a bowl, to catch the pulp and liquid, grate the kernels from the remaining three ears of corn, using the large holes of a box grater. Add to the stock mixture, along with the diced turkey and celery. Bring the stock to a gentle boil. Add the noodles and simmer until cooked through, 10 to 12 minutes. Adjust the seasoning as desired and serve hot.

Thursday, September 23, 2010

Week 15: Lasagna With Squash and Kale


I had ambitious cooking plans for the week. I also had ambitious work plans. Work won out, and that's why I have a head of green cabbage, a butternut squash, and a couple of beets to carry me into the coming CSA week.

Still, we had two good CSA-centric meals. One was a pot of roasted vegetables that included this week's eggplant and tomatoes along with onions, garlic, pepper, and potato. It was similar to ratatouille, but accompanied by a Thai-inspired peanut sauce. (I liked it better without the sauce.) The other meal was lasagna, a multi-step, multi-pot concoction that I decided to tackle when a client's database problems prevented me from logging into work. (Ah, the joys of being a remote freelancer.) The lasagna, which used up one of our butternut squashes and our kale, ultimately was worth the work. It would make a lovely vegetarian entree for Thanksgiving.

Lasagna With Squash and Kale
(Adapted from Sunset Magazine. The lasagna can be assembled and refrigerated up to a day ahead of baking.)

4 Tbsp olive oil (divided use)
1 medium red onion, chopped
3 cloves garlic (1 minced; 2 peeled but left whole)
1 can (28 oz.) crushed tomatoes
1 tsp dried oregano
Salt and pepper
6 cups butternut squash, peeled and cut into 1/2-inch cubes (about 3 pounds squash)
1/2 tsp dried thyme
1 pound kale
9 whole-wheat lasagna noodles (8 oz.)
1 container (15 oz.) part-skim ricotta cheese
1/8 teaspoon ground nutmeg
2 cups (8 oz.) shredded mozzarella cheese (divided use)

Prepare the sauce: Heat 2 tablespoons of the olive oil in a sauce pot over medium heat. Cook the onion and minced garlic for about 5 minutes, or until the onion softens, then add in the tomatoes, oregano, 1/2 teaspoon salt and 1/2 teaspoon pepper. Reduce the heat and simmer the sauce for about 20 minutes, then set aside.

Prepare the squash: Heat the oven to 400 degrees. Toss the squash cubes and the whole garlic cloves with the remaining 2 tablespoons of olive oil. Sprinkle with the thyme; sprinkle with salt and pepper as desired. (I used only pepper.) Spread on a large baking pan (10 by 17 inches) and bake until soft, about 15 minutes. (Note: The squash won't cook that fast if your cubes are larger than the 1/2-inch dice.) Let the squash and garlic cool a bit, then puree them in a food processor and set aside.

Prepare the kale: Bring about 3 quarts of water to a boil in a large pot. Remove the center ribs from the kale leaves. Discard the ribs and boil the kale leaves for about 5 minutes or until soft. Drain, let cool, then squeeze out as much water as possible from the leaves. Chop the leaves finely.

Prepare the noodles: Bring a large pot of salted water to a rolling boil. Add the lasagna noodles, a few at a time, to keep the water boiling. Cook the noodles for about 10 minutes, or as directed on the packaging, until tender. Drain the noodles and rinse with cold water. Separate the noodles and lay out on wax paper to keep them from sticking to one another.

Prepare the cheese: Mix together the ricotta cheese, nutmeg, 1 cup of mozzarella, and another 1/2 teaspoon of pepper. Set aside.

Assemble the lasagna: Layer the components in a 9-by-13-inch baking dish in this order, spreading the layers as evenly as possible:
  • 1.5 cups tomato sauce
  • 3 noodles
  • All of the squash
  • One-half of the kale
  • 3 noodles
  • All of the ricotta cheese mixture
  • All of the remaining kale
  • 3 noodles
  • Remaining tomato sauce
  • Remaining 1 cup mozzarella (or a bit less, depending on taste)
Bake at 350 degrees for 30 minutes or until the cheese is melted and the juices are bubbling. Add 10 to 15 minutes to the baking time if the lasagna has been pre-assembled and refrigerated. Let the lasagna stand 10 minutes before slicing.

Thursday, September 9, 2010

Week 13: Last Blast of Summer Corn Salad

corn and bean saladThe defining word for this week is "transition." The calendar says summer, but I'm making the mental switch to autumn. Well ... mostly, which is why corn on the cob appeared on our Rosh Hashanah table, along with the soup and brisket and apples.

It was a hefty CSA haul this week: peaches, apples, green beans, green tomatoes, plum tomatoes, cucumbers, and corn. The Programmer, Caboodle, and I also made an apple-picking pilgrimage to Russell Orchards on Sunday -- not that we needed more apples, but our schedule gets tighter as the season goes on. (I don't think the girls will object if I use some of those apples in a cake or crisp sometime soon.)

The week's produce (and last week's leftovers) wound up in a variety of dishes: carrot cake for Kit's birthday; butternut squash soup, kicked up a notch with a bit of hot pepper; corn muffins, made with fresh corn kernels; a green tomato gratin, with feta cheese; refrigerator pickles; curried vegetables, featuring green beans, plum tomatoes and a purchased cauliflower; roasted peaches (delicious with vanilla yogurt; even better with French vanilla ice cream); lots of applesauce, now mostly in the freezer; and an apple-celery root slaw with a mustard-honey dressing.

I pulled together this corn salad as our family's contribution to a Labor Day weekend barbecue. I love the combination of corn and beans; see my Seaside Corn and Bean Salad for another variation.

Last Blast of Summer Corn Salad
(Serves 8 or more as a side dish)

6 ears of corn
1 can (15.5 ounces) black beans, drained and rinsed
1 can (15.5 ounces) chickpeas, drained and rinsed
1 pickling cucumber, seeded and diced, but peel left on (about 1 cup)
1/2 to 1 cup diced red onion
1 Tbsp red basil, chopped
Juice of 1 lime
Salt to taste

Lightly steam or boil the corn, then place in cold water to stop the cooking. Drain corn and remove kernels from the cobs. Mix corn kernels with the remaining ingredients. Refrigerate if not serving immediately.

Thursday, August 12, 2010

Week 9: Main-Dish Peaches

peach saladQuick word game: I say "peach" and you say ...

Cobbler, probably. Maybe pie. Maaaaayyyybe ice cream.

I bet you didn't say salad, or stir fry, or salsa.

When the farm gave us nearly 5 pounds of peaches last week, I dismissed the inclination to make a cobbler and took the opportunity to try out more savory recipes. That's how we wound up eating a peach and corn salad (pictured); beef stir fry with peaches; peach salsa; chicken in a ginger-peach sauce--not to mention a couple of peaches eaten just out of hand. (Naturally, I still indulged my sweet tooth with a cup of peach ice cream at Richardson's.)

It was not solely peaches in the share. We also received corn; tomatoes; eggplants; and 20 tiny plums. But peaches were the stars of the week.

Peach Salad With Corn and Fresh Mozzarella

This is a super-easy recipe, adapted from one on About.com. Our corn was so good we ate it raw, but you can boil or grill yours if you like.

Mix together:

2 peaches, diced
Kernels from 2 ears corn
2 ounces fresh mozzarella, diced
6 basil leaves, slivered, or to taste

Eat the salad plain or drizzle with extra virgin olive oil, or drizzle with both olive oil and a little balsamic vinegar. Serves 1 to 2 as a light entree.

Peach-Pepper Salsa

This one I served with pan-cooked tilapia.

2 diced peaches
1/2 cup diced green bell pepper
1/4 cup finely chopped red onion
1 tsp minced jalapeno pepper (seeds removed)
1 Tbsp finely chopped parsley
Salt and black pepper to taste
1 Tbsp vegetable oil
juice from 1/2 lime

Combine all ingredients and refrigerate at least an hour ahead of serving time to let flavors blend.

Beef Stir Fry With Peaches

Adapted from Steamy Kitchen

1 Tbsp soy sauce
1/4 tsp sugar
1 tsp corn starch
Black pepper, to taste
1 pound thinly sliced beef for stir fry
1 Tbsp oil
1/2 red onion, sliced
1 clove garlic, minced
4 ounces brown mushrooms, sliced
2 firm but ripe peaches, cut into wedges

Combine soy sauce, sugar, corn starch, black pepper, and beef. Let the beef marinate 10 minutes at room temperature.

Heat oil in a large frying pan over high heat. Quickly cook beef, about 2 to 3 minutes, then remove from frying pan. Turn down the heat slightly and add onions, mushrooms, and garlic. Cook about 5 minutes, until vegetables soften and mushrooms give off some of their liquid.

Add in the peach slices and let them heat through, 1 to 2 minutes. Add the beef back into the pan, toss to combine and cook just another minute or so until heated through.

Thursday, July 15, 2010

Week 5: Summer Succotash

Photo courtesy of Doves and Figs

The invitation instructions were deceptively simple. An Americana-themed party. Pot luck dinner. Bring a dish that represents America to you.

Oh, soooo many ways to interpret that. I considered, and rejected, a whole raft of kitschy American recipes -- you know, the ones promoted by food manufacturers and featuring Jell-O or Cheez Whiz or condensed cream of mushroom soup. I took a pass on any elaborate construction projects or subtleties. I'm just not going to make a replica of the Statue of Liberty out of marshmallow treats, PVC pipe, and green fondant. (However, should this idea appeal to you -- if only for the "ick" factor -- you can find the how-to video here.)

I finally decided on succotash, for multiple reasons. Here's a dish that prominently features a New World crop, has strong regional associations, and evokes (for me, at least) pre-Colonial America and Thanksgiving. From a practical standpoint, succotash can sit out at room temperature on a buffet table for hours. It's a fun word to say. And I just plain like it. That this week's share included corn and green beans made my Summer Succotash recipe all the more appropriate.

Succotash fit in well among the pot luck offerings at the party. The interpretations of Americana included the nostaglic (daisy-shaped sandwiches with pimento cheese, a la 1917); regional foods (Southern mac and cheese pie); riffs on classics (vegetarian baked beans and gourmet sliders); a lot of blueberries (muffins, cornbread, pie, tarts, and cobbler); and plenty more stuff.

"Plenty more stuff" characterized our week. In addition to succotash (I made a batch for home, too), we ate CSA raspberries and blueberries out of hand; worked through most of an enormous head of Romaine lettuce; whipped up a zucchini-crusted pizza; made quick pickles from cucumbers and -- separately -- daikon radish (daikon was new to us; I'll have to post more about this another time); sauteed collard greens; and marinated summer squash and zucchini for a salad.

Summer Succotash
(adapted from The Boston Globe)

1/2 pound fresh green beans, cut into 1-inch pieces
4 ears of corn, kernels sliced off
1 large red onion, diced
3 scallions, thinly sliced, white and green parts kept separate
3 Tbsp fresh parsley, chopped
2 Tbsp olive oil
Salt and pepper

In a pot of gently boiling water, cook the beans for 2 to 4 minutes, until they are just tender. Drain the beans in a colander and rinse with cool water to stop the cooking.

Heat the oil in a large skillet over medium heat. Cook the corn and onion in the skillet about 3 minutes, or until the onion begins to soften, stirring occasionally.

Add the beans and the white parts of the scallions to the skillet. Cook about 2 minutes, or until all of the vegetables are cooked through to your liking. Off heat, stir in the parsley, green parts of the scallions, and salt and pepper to taste. Serve hot or at room temperature.

Thursday, July 1, 2010

Week 3: Beet Salads, Cooked and Raw

Excuse me a moment while I finish a yummy sandwich: Hummus, cucumber (nom, nom, nom), radish and arugula on whole wheat pita. Dang, I'm going to have to make more hummus to go with the leftover vegetables.

It's been a busy week in the kitchen of Chez Swiss Chard -- temporarily dubbed Hotel de la Chard over the weekend for Caboodle's belated birthday sleepover party. Aside from the party cooking (pasta and salad dinner, chocolate souffle cupcakes, breakfast buffet with pancakes and home fries), the CSA-specific rundown went something like this:
  • Steamed peas
  • Grilled zucchini and summer squash
  • Plenty of salad (Romaine, arugula, mixed salad greens)
  • Stuff added to salad (radishes, summer squash)
  • Stuff added to sandwiches (radishes, lettuce, arugula)
  • Raw beet salad
  • Braised greens (collards and beets), and ...
  • 2 Chocolate zucchini cakes (wrapped and frozen for later this summer)
I like the fact that beets are a two-for-one deal. If you need ideas for the greens, remember that beets are related to Swiss chard, and you can use the greens in much the same way.

Having received beets both this week and last, we tried out two very different takes on beet salads. We'll start with Week 2's salad, pictured above. (We made just a half-batch, enough for 3 or 4 servings.)

Beet Salad With Oranges and Beet Greens
(adapted from Bon Appetit)

Leftovers taste fine, but the vibrant color fades with refrigeration.

6 medium beets, washed and trimmed, greens reserved
2 seedless oranges, peeled and sectioned
1 sweet onion, peeled and sliced thinly
1/3 cup red wine vinegar
1/4 cup extra virgin olive oil
2 garlic cloves, minced
Salt and pepper to taste

Roast, steam or boil the beet roots, depending on your cooking preference and how hot it is in your kitchen. Cool, then peel the beets, and cut into wedges. Coarsely chop the greens, discarding the stems. Cook the greens in a large pot of boiling water until tender, about 2 minutes. Drain, cool, and squeeze out any excess moisture. Combine the beets and greens in a bowl. Add the orange segments and sliced onion. Whisk the vinegar, olive oil, and garlic; dress the salad. Let stand at room temperature 1 hour before serving.

This week's salad:

Raw Beet Salad
(adapted from a Mark Bittman recipe, via Serious Eats)

1/2 lb beets
1/2 lb carrots
1/2 onion
1 Tbsp minced ginger root
2 tsp Dijon mustard
1 Tbsp canola oil
2 Tbsp fresh lime juice
1/4 cup chopped cilantro
Salt and pepper to taste

Peel the beets, carrots, and onion. Combine them in a food processor and pulse until chopped, or grate the vegetables separately. Place in a bowl and add in the ginger. Combine the mustard, oil, and lime juice, and add to the salad, tossing to coat. Mix in the cilantro. Adjust the seasonings and serve.

Monday, February 8, 2010

Winter Ratatouille

On the subject of bowls, here's the recipe for last night's ratatouille. I think it's misnamed; it's full of what I would consider late summer/early autumn vegetables rather than dead-of-winter produce. Still, I was able to take advantage of my greengrocer's special on zucchini.

Winter Ratatouille
(Adapted from The Times of London)

Fat-free olive oil cooking spray
2 onions, finely sliced
2 garlic cloves, minced
1 (14.5 ounce) can tomatoes (petite diced)
Kosher salt and black pepper to taste
1 bay leaf
Rosemary leaves from 3 sprigs
Thyme leaves from 10 sprigs
3 parsnips, peeled and sliced (remove any woody cores)
1 sweet potato, peeled and sliced
1 large globe eggplant, cubed (or 3 slim Japanese eggplants, sliced)
2 to 3 zucchini, sliced into half-moons
1 cup water
2 Tbsp red wine vinegar

Spray the bottom of a Dutch oven with cooking spray; heat. Saute the onions until soft, about five minutes.

Add the garlic, tomatoes, salt, pepper and herbs, and cook for about 15 minutes until the tomatoes thicken slightly.

Add in the remaining ingredients and bring to a boil. Reduce heat, cover, and simmer for 30 to 40 minutes or until the vegetables are tender and coated with the sauce. If the stew is too soupy, increase the heat and cook, uncovered, to reduce the liquid. (I did not have to do this).

Serve as is or over pasta. The ratatouille can be made ahead and reheated.

Tuesday, January 26, 2010

Back to Our Roots

root vegetablesGotta love New England in January. Snow, drizzle, flurries, a peek of sunshine, a little thaw, some freezing rain. And that was just one afternoon last week.

Perfect weather for some ice cream. The girls and I have been treating ourselves to sundaes, but it's not a long-term strategy. So in between the frozen treats I've been focusing on stews and casseroles and roasts. Root vegetables have starred in several of these meals; not only are they widely available this time of year, but they also hold up well in the long-cooking, kitchen-warming dishes that I reserve for winter.

We found an array of root vegetables and other wintry things (like squash, and, um, gelato!) at the winter farmers' market in Wayland. It's worth a visit if you are in the area, but go early: We apparently missed out on some greenhouse-grown Swiss chard.

Part of the farmers' market haul wound up in this stew:

Vegan (and Fat Free) Winter Vegetable Stew
(adapted from the International Vegetarian Union web site)

Peel and cube:
1 rutabaga
3 turnips
3 to 4 carrots
1 sweet potato
2 to 3 white potatoes

Chop:
1 large onion

Rinse well:
1/2 cup barley

Put everything into a large stew pot (mine holds 8 quarts), and add water to cover (about 11 cups). Bring to a boil, then lower heat and let simmer for about an hour, until all is nearly tender.

Add:
1/3 cup red lentils
1 tsp dried sage
1 tsp dried rosemary
1 tsp dried tarragon
salt and fresh ground black pepper to taste

Simmer until the lentils have cooked, fallen apart and thickened the stew, about 20 minutes. Add more water if necessary.

Notes: The recipe yields a ton (about 16 cups), so keep that in mind if you have a vegetable-averse household. Like most stews, this one tastes even better the second day. Leftovers will continue to thicken because of the barley.

Saturday, December 26, 2009

Soup's On

Mother Wolff SoupI make soup all year round, but I love, love, love soup on a cold day. My pantry is stocked with dried peas and lentils for spur-of-the-moment pots of goodness, but sometimes I break out more time-consuming recipes. On a rather blustery day, Mother Wolff Soup simmered on my stovetop for about four hours, requiring only the occasional stir. The soup came out more brothy than I expected -- especially in light of the ingredient list: lima beans and barley and rice and potatoes. Still, Kit went for a second bowlful, and leftovers improved from sitting in the fridge for a day or two, so the recipe is a keeper.

A much quicker soup is Vegetarian Split Pea. It's stick-to-your-ribs thick and it goes from pantry to table in less than an hour.

Mother Wolff Soup
(adapted from Sundays at Moosewood Restaurant)

4 quarts water
1/2 cup dried lima beans, soaked overnight
1 cup cooked rice
1/2 cup barley
4 large garlic cloves, minced
1 Tbsp dried dill
1 bay leaf
2 Tbsp vegetable oil
1 cup diced onions
1 cup chopped celery
1 Tbsp sweet paprika
1 cup diced potatoes
1 cup diced carrots
1/2 tsp salt
ground black pepper
1 cup frozen peas
1 cup chopped canned tomatoes
1/4 cup chopped fresh parsley

In a large soup pot, combine water, drained limas, rice, barley, garlic, dill, and bay leaf. Bring to a boil, then lower heat, cover and simmer for 1.5 hours.

About an hour into the simmering time, heat the oil in a large frying pan and saute the onion and carrots for a few minutes. Mix in the paprika, potatoes, carrots, salt, and pepper. Cover and cook for a few minutes, stirring frequently, then add in the peas and cook, covered, a few minutes more.

Remove the bay leaf from the soup pot and add in the sauteed vegetables, tomatoes, and parsley. Add more salt and pepper if desired. Simmer the soup, on low heat, for another 1.5 to 2 hours, stirring occasionally.

Vegetarian Split Pea Soup
(adapted from various recipes)

1 Tbsp olive oil
1 large onion, diced
1 carrot, diced
7 cups water
1 lb dried split peas
1 Tbsp fresh thyme
Juice of one-half lemon (or more, to taste)
1/2 tsp to 1 tsp salt
Paprika to taste

In a 5-quart Dutch oven, heat the olive oil over medium-high heat and saute the onion and carrot until they begin to soften, about 5 minutes. Add the water, peas, and thyme to the pot; bring to a boil, then lower the heat and simmer the soup for about 40 minutes or until the peas are soft, stirring occasionally.

Measure out 4 cups of soup and puree them in a food processor. Return the pureed soup to the remaining soup in the pot. Add salt, lemon juice, and paprika to taste. (For a "meaty" taste, try this with smoked paprika. Or, for another flavor profile, leave out the paprika and sprinkle in curry powder.)

Friday, December 4, 2009

Repurposing Contents

Bubble and SqueakYup, I followed my own advice and made Bubble and Squeak. This one featured leftovers from a couple of dinners: mashed potatoes, carmelized onions, and peas.

Coincidentally, The Boston Globe this week debuted a food column about creating new meals from parts of a previous one. I find columns like this just a tad silly: Don't all cooks do this naturally? (Thinking here ...) Okay, I suppose they don't, but it's standard operating procedure at Chez Swiss Chard.

I love Thanksgiving dinner because it provides a mother lode of secondary meals. The carcass becomes stock. Stock becomes soup or the base of a sauce. Sauce plus leftover turkey meat becomes turkey a la king or curry. Sauce plus leftover turkey meat plus leftover vegetables becomes tetrazzini (if you add pasta) or shephard's pie (if you top it with leftover mashed potatoes). The possibilities aren't endless (unless you have a really big turkey) but it's well worth the effort to roast that bird.

Here's a dairy-free take on turkey tetrazzini that I concocted several Thanksgivings ago. It makes good use of leftovers.

Turkey Kosherzzini
(Adapted from
Jane Brody's Good Food Book)

1 tablespoon pareve margarine or olive oil
1/2 pound mushrooms, sliced
2 tablespoons flour
1/2 tsp salt
1/4 tsp black pepper
2 cups turkey or chicken stock
1 tsp Worcestershire sauce
1 green bell pepper, seeded and diced
1/3 cup sliced scallions or onions
leftover cooked vegetables, such as broccoli, peas, or green beans (amount is flexible; let's say 1 to 2 cups)
2 cups cooked turkey, cut into small cubes
1/2 pound spaghetti, cooked and drained

In a large, heavy saucepan over medium heat, saute the mushrooms in the margarine or oil until tender. Stir in the flour, salt, and pepper. Gradually whisk in the stock. Add the Worcestershire sauce and simmer, stirring, until the sauce has thickened a bit. Add the bell pepper, scallions or onions, and leftover vegetables and mix well. Stir in the turkey and spaghetti.

Pour the mixture into a greased 2-quart shallow casserole or baking dish. Bake, uncovered, in a 350 degree oven for about 20 minutes or until heated through.