Friday, May 20, 2011

Labneh (Yogurt Cheese)

I have an abundance of herbs popping up in my garden: chive, oregano, parsley -- all of them perennials that survive despite significant neglect. They are precursors to the CSA season, and they were the impetus behind a couple of recent experiments with labneh.

Labneh
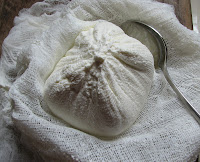
Labneh, made with whole-milk yogurt.
Labneh, of Middle Eastern origin, is nothing more than yogurt drained of its whey to make make a spreadable cheese. It has a consistency similar to cream cheese, but it retains the distinct sourness of yogurt. For me, that makes it a bit of an acquired taste. So far, I've liked it best dabbed on bananas (reminiscent of bananas and sour cream), mixed with chive and spread on a toasted bagel, and slathered on pumpernickel-and-onion pretzels. It plays well with strong flavors -- fresh herbs, garlic, horseradish, olive oil, olives, black pepper -- and counterbalances sweet ones -- honey, berries, or dried fruit, for example.

Labneh is probably the easiest cheese to make at home: two ingredients and minimal equipment. For comparison sake, I made one batch using non-fat yogurt and a second batch with full-fat yogurt. The full-fat yogurt naturally produced a firmer, richer cheese, but even the non-fat yogurt had decent results (plus, no fat!). Whatever type of yogurt you choose, get a high-quality one that does not contain gelatin, pectin, or stabilizers, as any additives will affect how the yogurt drains.

Labneh


Ingredients and Tools

1 quart plain yogurt
1/2 tsp. kosher salt
A deep bowl
Fine-mesh sieve
Cheesecloth or muslin
Kitchen twine

Method

Place the sieve on top of your bowl. Fold a large square of cheesecloth into quarters and set it inside the sieve, or substitute a piece of muslin for the cheesecloth.

Mix the salt into the yogurt, and pour the mixture into the cheesecloth. Let it drain for about 10 minutes, then bring the ends of the cheesecloth together to form a bundle of yogurt. Tie the bundle with kitchen twine.

Leave the bundle in the sieve, or tie it to a wooden chopstick and place the chopstick across the top of the bowl so the bundle is suspended. Let the yogurt drain, refrigerated, for 12 to 24 hours. The longer it drains, the thicker the final product will be. Keep an eye on the level of the liquid (whey) that's collecting in the bowl, and make sure it never reaches the bottom of the bundle or sieve. You can save the whey for cooking or baking, or discard. I found it easier to suspend the bundle after the yogurt had drained for a couple of hours and had compacted somewhat, so the bundle didn't hang as low in the bowl.

When the yogurt has drained sufficiently, untie the bundle, remove the cheesecloth, and transfer the cheese to a serving dish or container. Refrigerate leftovers.

Tuesday, May 10, 2011

Fabulous Beef Roast With Garlic, Horseradish, and Mustard

Roasted broccoli and some of our
CSA squash rounded out the meal.
Here's what ordinarily happens when I buy a fresh horseradish root. I grate it up for the Passover seder, use a couple of spoonfuls on gefilte fish, and then forget about it for months as it grays in a corner of the fridge. But not this year. That's because I came across a beef roast recipe that's perfect for leftover horseradish.

I almost never, ever roast a hunk of beef (my go-to meat -- brisket -- is braised), so I was a little concerned about how this would come out. The verdict: A thumb's-up from everyone in the household. Ha! I'm thinking this dish could become a regular post-Passover tradition.

(A word of caution, though, if this recipe appeals to you as a Passover entree. Mustard is considered kitniyot, and by tradition is not used by Ashkenazi Jews during the holiday. Please don't ask me to explain this.)

Fabulous Beef Roast With Garlic, Horseradish, and Mustard
Adapted from Canadian Living magazine

Many resources recommend letting large cuts of meat come up to room temperature before cooking. Remove the roast from the refrigerator about an hour before you want to put it in the oven.

5 lb boneless beef rib roast
2 Tbsp dry mustard
1 Tbsp water
10 cloves garlic, minced
1/3 cup prepared white horseradish (fresh grated, or from a jar)
3 Tbsp vegetable oil
2 tsp dried thyme
1 tsp black pepper

Lightly grease a roasting rack and place it in a foil-lined roasting pan. Place the beef roast on the rack, fat side up.

In a small bowl, stir together the dry mustard and water to make a paste. Mix in the garlic, horseradish, vegetable oil, thyme, and pepper. Spread the mixture over the top and sides of the meat. (If desired, you can cover and refrigerate the coated meat for up to a day.)

Roast the meat in a 325-degree F oven until a meat thermometer inserted in the center registers 140 degrees F for rare or 150 degrees F for medium, roughly 1.5 to 2.5 hours. (The timing can vary considerably, depending on the size and shape of your roast, the internal temperature of the meat when you start cooking, and the accuracy of your oven temperature.)

Transfer the roast to a carving board, tent with foil, and let stand for at least 10 minutes, or up to 30 minutes. The temperature should rise another 5 degrees upon standing. Slice and serve.

Preparing Fresh Horseradish


Scrub the surface of the horseradish root with a brush. Place the root into a bowl of water and peel it while it is submerged; this keeps the cut surfaces from being exposed to the air, which in turn makes it less irritating for your eyes.

Remove the peeled root from the water, quickly chop into pieces, and place into the bowl of a food processor fitted with the steel blade. Pulse to finely chop the horseradish. Add some water and white vinegar and process to combine.

How much water and vinegar you need will depend on the size of the horseradish root; figure 3 to 4 tablespoons of water and 1 tablespoon of vingear for a 6- to 7-ounce root. Take care in removing the food processor cover: Fresh horseradish is pungent.